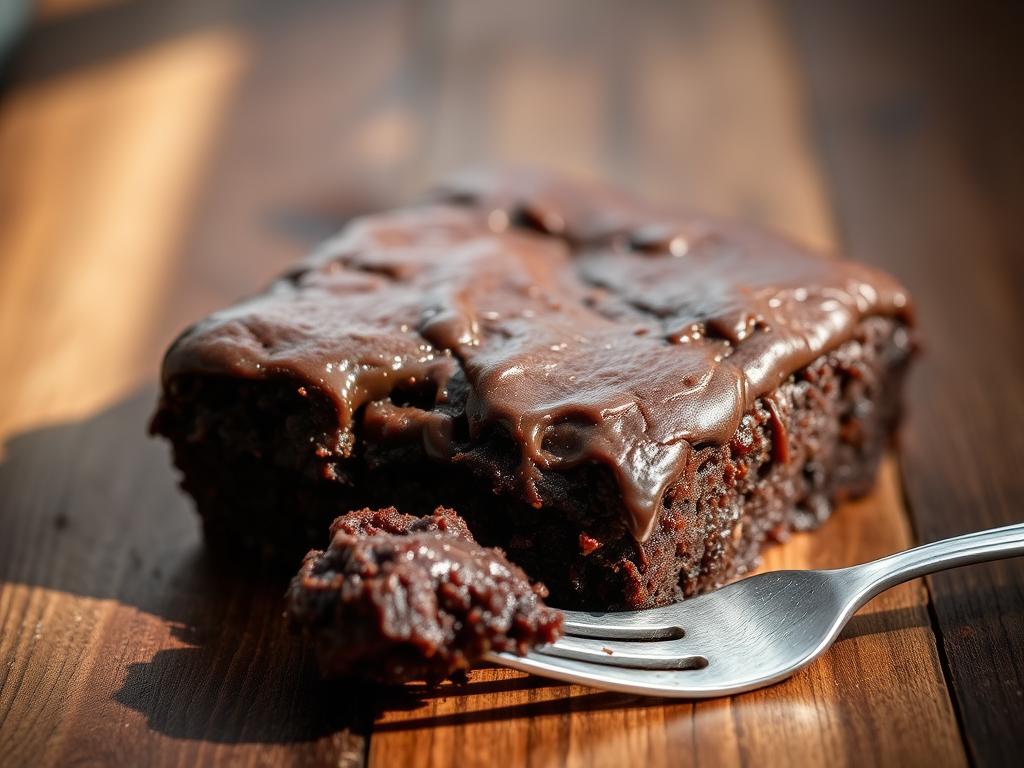
If you’re craving a decadent dessert that’s both simple and indulgent, this chocolate dump cake recipe is perfect for you. With just five ingredients, it’s a fuss-free treat that delivers a rich, gooey texture every time. Whether you’re a beginner or a seasoned baker, this recipe is designed to impress with minimal effort.
What makes this dessert stand out is its clever use of a dry cake mix and instant pudding. These ingredients create a luxurious consistency that’s hard to resist. Plus, the addition of chocolate chips ensures every bite is packed with flavour. Best of all, it takes just 10 minutes to prepare and 30 minutes to bake, making it ideal for busy days or last-minute gatherings.
This chocolate dump cake is not only easy to make but also versatile. Serve it warm with a scoop of ice cream or enjoy it as a standalone treat. Its balance of sweetness and texture makes it a crowd-pleaser for any occasion. Ready to get started? Let’s dive into the details of this irresistible recipe.
When simplicity meets decadence, this dessert takes the spotlight. It’s a modern twist on traditional baking, designed to save time without compromising on taste. The idea behind this creation is to bring together everyday ingredients in a way that feels both comforting and indulgent.
Inspiration Behind the Recipe
The concept of a dump cake originated from the need for quick, fuss-free desserts. This version, with its rich chocolate flavour, was inspired by the classic “Death by Chocolate” trend. By combining a boxed mix, instant pudding, and chocolate chips, it delivers a luxurious texture and intense taste.
What makes this dessert stand out is its effortless preparation. Simply layer the ingredients, bake, and enjoy. The result is a gooey, indulgent treat that’s perfect for satisfying late-night cravings or impressing guests. Its versatility allows it to shine as both a quick weekday treat and a show-stopping dessert.
Whether served warm with ice cream or enjoyed on its own, this dessert is a crowd-pleaser. Its magical simplicity has made it a favourite among baking enthusiasts, proving that great flavour doesn’t have to be complicated.
Ingredients and Tools You’ll Need
To create this indulgent treat, you’ll need a handful of essential ingredients and tools. Each component plays a crucial role in achieving the perfect balance of flavour and texture. Here’s everything you’ll need to get started.
Essential Ingredients
The recipe calls for a standard box of cake mix, a small box of instant chocolate pudding, and a cup of milk. These form the base of the dessert, providing structure and richness. Additionally, you’ll need cocoa powder and chocolate chips for an extra layer of decadence.
Here’s a breakdown of the measurements:
Ingredient
Quantity
Cake Mix
1 box
Instant Chocolate Pudding
1 small box
Milk
1 cup
Cocoa Powder
2 tablespoons
Chocolate Chips
1 ½ cups
Must-Have Kitchen Equipment
To ensure a smooth baking process, you’ll need a few key tools. A standard 9×13 inch baking dish is ideal for even baking. A large bowl and whisk are essential for mixing the ingredients thoroughly. Measuring cups are also crucial for accurate ingredient allocation.
Alternative Ingredient Options
For a creative twist, consider using dark chocolate fudge or devil’s food cake mix varieties. If you prefer a richer texture, substitute milk with heavy cream. High-quality chocolate chips are recommended for a more intense flavour. Remember, the instant chocolate pudding must be used (not the “cook and serve” type) for proper consistency.
“Using high-quality ingredients can elevate the taste and texture of your dessert.”
For another simple yet delightful dessert, try the Lemon Cream Cheese Dump Cake, which combines tangy lemon pie filling with rich cream cheese for a unique flavour profile.
Step-by-Step Guide to a chocolate dump cake recipe
Creating this indulgent treat is simpler than you might think, thanks to its straightforward layering technique. Follow these steps to achieve a perfect balance of textures and flavours.
Layering and Combining Ingredients
Start by preheating your oven to 350°F (175°C). Take a 9×13 inch baking dish and evenly sprinkle the dry cake mix and pudding mix across the base. This ensures a uniform texture throughout.
Next, add a generous layer of chocolate chips. Drizzle one cup of milk evenly over the top. Gently stir the mixture to combine the ingredients without overmixing. This prevents clumping and enhances consistency.
Baking Method and Technique
Place the dish in the preheated oven and bake for 30-35 minutes. The exact time may vary slightly depending on your oven, so keep an eye on it. To check for doneness, insert a toothpick into the center of the dessert. If it comes out clean, it’s ready.
Once baked, remove the dish from the oven and let it cool for 10-15 minutes. This allows the flavours to settle and the texture to firm up slightly. The result is a delightful mix of a firm base and a gooey, moist top.
Step
Details
Preheat Oven
350°F (175°C)
Layer Dry Ingredients
Evenly sprinkle cake mix and pudding mix
Add Chocolate Chips
Generous layer
Drizzle Milk
1 cup, evenly distributed
Bake
30-35 minutes
Check Doneness
Insert toothpick in center
For another delightful dessert option, try this Rich & Gooey Chocolate Dump Cake, which combines simplicity with indulgence.
Quick Tips and Creative Variations
Looking to elevate your dessert game? Here are some quick tips and creative variations to make your treat even more irresistible. Whether you’re serving it at a gathering or enjoying it at home, these ideas will add a personal touch to your creation.
Tweaks for Extra Decadence
For an indulgent twist, consider adding extra chocolate chips or a dash of cocoa powder. These small additions can intensify the flavour and make each bite more satisfying. If you’re a fan of gooey textures, try incorporating mini marshmallows or chopped chocolate bars into the mix.
Another way to enhance the richness is by dissolving instant coffee in the milk. This adds a subtle depth of flavour without overpowering the dessert. For a luxurious finish, serve it warm with a generous scoop of vanilla ice cream and a dollop of cream.
Innovative Mix-Ins and Flavour Twists
Experimenting with mix-ins is a great way to personalise your dessert. For a seasonal twist, try adding pitted cherries and a light dusting of icing sugar to create a Black Forest-inspired treat. Alternatively, incorporate chopped nuts or caramel bits for added crunch and sweetness.
If you’re feeling adventurous, swap the milk for heavy cream to achieve a richer texture. You can also try using different cake mix varieties, such as dark chocolate fudge or devil’s food, to change the flavour profile. The simplicity of the recipe leaves plenty of room for creativity.
“The beauty of this dessert lies in its versatility. Don’t be afraid to experiment with flavours and textures to make it your own.”
Remember, the key is to balance additional flavours without overwhelming the rich core of the dessert. Whether you’re adding seasonal ingredients or catering to dietary preferences, these tweaks ensure your creation is both unique and delicious.
Baking Times, Temperatures and Preparation
Achieving the perfect bake requires attention to detail, especially when it comes to timing and temperature. These factors play a crucial role in ensuring your dessert turns out moist, evenly baked, and full of flavour.
Preheating and Oven Settings
Start by preheating your oven to 350°F (175°C). This step is essential for even baking and helps the ingredients set properly. Skipping preheating can lead to uneven results, so always allow the oven to reach the correct temperature before placing your dish inside.
Use a standard 9×13 inch baking dish for best results. This size ensures the dessert bakes uniformly and prevents over-browning at the edges. If you’re using a different size or type of dish, adjust the baking time slightly to compensate.
Checking Doneness and Adjusting Time
Bake the dessert for 30-35 minutes, or until the top is golden brown. To check for doneness, insert a toothpick into the centre. If it comes out clean, your dessert is ready. If not, bake for an additional 2-3 minutes and check again.
If your dessert appears undercooked, cover it with foil to prevent over-browning and continue baking. Conversely, if it’s drying out, reduce the temperature by 10°F and monitor closely. These small adjustments can make a big difference.
Preheat the oven to 350°F (175°C) for even baking.
Bake for 30-35 minutes, checking with a toothpick for doneness.
Adjust baking time if using a different size or type of dish.
Allow the dessert to cool on a wire rack for 10-15 minutes before serving.
Once baked, let the dessert cool on a wire rack for 10-15 minutes. This allows the flavours to settle and the texture to firm up slightly. Serving it warm enhances the gooey, indulgent experience.
“Precision in baking is key. Following these guidelines ensures a consistently excellent result every time.”
Serving Suggestions and Accompaniments
Transform your treat into a showstopper with these presentation tips. Whether you’re serving it at a family gathering or a formal event, the right accompaniments can elevate your dessert to the next level. From creamy pairings to vibrant garnishes, these ideas ensure every bite is memorable.
Perfect Ice Cream Pairings
Nothing complements a warm dessert better than a scoop of cold vanilla ice cream. The contrast in temperature and texture creates a delightful balance that’s hard to resist. For a twist, try pairing it with salted caramel or mint choc chip ice cream. These flavours enhance the richness without overpowering the dessert.
Garnish Ideas for Added Flair
Garnishes add a touch of elegance and flavour. A light dusting of powdered sugar or a sprinkle of sea salt can intensify the taste. For a pop of colour, consider fresh mint leaves or a handful of berries. A drizzle of chocolate sauce or caramel adds a luxurious finish, making your dessert visually appealing and irresistibly tasty.
Serve in individual portions for an elegant presentation.
Pair with complementary sides like whipped cream or fruit compote.
Use vibrant garnishes such as edible flowers or citrus zest.
“The right accompaniments can turn a simple dessert into a culinary masterpiece.”
For more inspiration, explore this Rich & Gooey Chocolate Dump Cake, which combines simplicity with indulgence. Whether you’re aiming for a casual family dessert or a sophisticated presentation, these serving suggestions ensure your creation is a hit every time.
Storage and Reheating Guidelines
Proper storage and reheating techniques ensure your dessert remains as delightful as the day it was baked. Whether you have a small portion left or want to prepare in advance, these guidelines will help maintain its quality and flavour.
Best Practices for Room Temperature and Refrigeration
For short-term storage, keep your dessert at room temperature for up to 2-3 days. Place it in an airtight container to prevent it from drying out. If you prefer refrigeration, it can last up to 5 days. Ensure the container is tightly sealed to retain moisture and prevent odours from affecting the taste.
Freezing Tips for Future Enjoyment
To extend its shelf life, freeze your dessert in portioned servings. Wrap each piece tightly in cling film or aluminium foil, then place them in a freezer-safe, airtight container. This method prevents freezer burn and preserves the texture. When ready to enjoy, thaw it in the refrigerator overnight for best results.
Storage Method
Duration
Room Temperature
2-3 days
Refrigeration
Up to 5 days
Freezing
Up to 3 months
For reheating, use a microwave for individual servings in 30-second intervals until warm. Alternatively, place larger portions in a preheated oven at 350°F (175°C) for about 15 minutes. This restores the fresh-baked texture and enhances the gooey consistency.
Always use airtight containers to prevent drying out.
Avoid over-reheating to maintain the dessert’s moisture.
Label frozen portions with the date for easy tracking.
“Proper storage and reheating can transform leftovers into a treat that tastes just as good as the first day.”
By following these simple steps, you can enjoy your dessert over several days or even weeks. Careful storage ensures every bite remains as indulgent as the first.
Conclusion
This indulgent treat proves that simplicity and decadence can go hand in hand. With just a boxed mix, instant pudding, and a few pantry staples, you can create a dessert that’s both effortless and luxurious. The creamy richness of the pudding, combined with a hint of butter, ensures every bite is a delight.
Whether you’re whipping it up for a quick weeknight treat or serving it at a gathering, this dessert’s versatility shines. Its straightforward preparation makes it perfect for bakers of all skill levels, while its indulgent flavour keeps everyone coming back for more.
We encourage you to try this recipe and experiment with your own creative twists. Share your variations and feedback to inspire others. After all, the beauty of this dessert lies in its ability to adapt to your preferences while maintaining its timeless appeal.
FAQ
What makes this dessert so quick to prepare?
This treat requires minimal effort as it involves layering ingredients directly into a baking dish without the need for mixing or complex techniques.
Can I use a different flavour of cake mix?
Absolutely! While the recipe calls for a specific flavour, you can experiment with other varieties like vanilla or caramel for a unique twist.
Is it necessary to use instant pudding mix?
The pudding mix adds richness and moisture, but you can substitute it with a similar dry ingredient or omit it if preferred.
What’s the best way to serve this dessert?
It pairs wonderfully with a scoop of vanilla ice cream or a dollop of whipped cream for added indulgence.
How should I store leftovers?
Keep any remaining portions in an airtight container at room temperature for up to two days or refrigerate for longer freshness.
Can I freeze this dessert for later?
Yes, you can freeze it in a sealed container for up to three months. Thaw at room temperature before reheating.
What’s the ideal baking temperature and time?
Preheat your oven to 175°C (350°F) and bake for approximately 45 minutes, or until the top is golden and the centre is set.
Are there any creative add-ins I can try?
Consider incorporating chocolate chips, nuts, or even a drizzle of caramel sauce for extra flavour and texture.
Can I make this dessert ahead of time?
Yes, you can prepare it a day in advance and reheat it gently before serving to maintain its gooey texture.