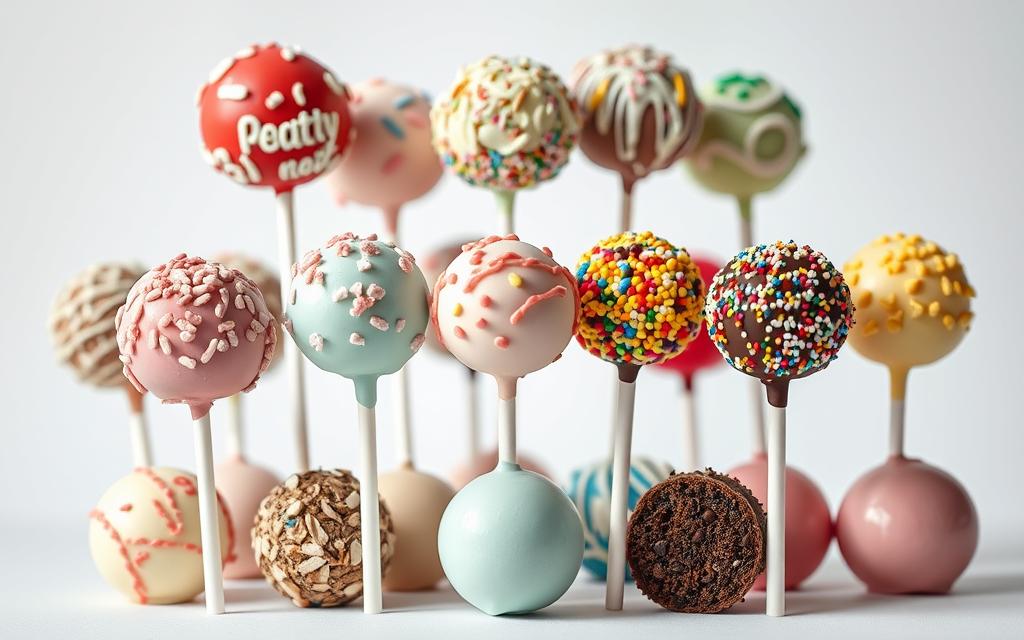
Cake pops have become a delightful treat for various celebrations, including birthdays, baby showers, and holidays. They are essentially homemade cake mixed with frosting, rolled into balls, and dipped in chocolate coating.
This comprehensive guide will walk you through the process of creating perfect cake pops from scratch. You’ll learn about selecting the right ingredients for your recipe, troubleshooting common issues, and customizing your treats for different occasions.
Whether you’re a beginner or an experienced baker, this guide will help you create beautiful and delicious cake pops that will impress your friends and family.
Cake pops are a beloved dessert that combines the best of cake and frosting, formed into bite-sized balls and typically coated in chocolate or candy melts. They are a creative and delicious treat that has gained popularity worldwide.
The Cake Pop Phenomenon
The rise of cake pops to fame can be attributed to their unique presentation and versatility. They are not only a treat for the taste buds but also a feast for the eyes, with their colorful coatings and decorations.
Homemade cake pops made from scratch have a distinctly better taste than those made with box cake mix and canned frosting. The use of quality ingredients results in a fresher, more authentic flavor. Here are some benefits of making cake pops at home:
Control over the quality of ingredients, ensuring a fresher taste.
Customization of sweetness and flavor profiles.
A more consistent and satisfying texture.
Aspect
Homemade Cake Pops
Store-bought Cake Pops
Taste
Fresh, authentic flavor
May contain preservatives
Customization
Flexible flavor and sweetness
Limited flavor options
Texture
Consistent and satisfying
May be inconsistent
Essential Ingredients and Tools
To create delightful cake pops, it’s crucial to start with the right ingredients and tools. The quality of your cake pops depends significantly on these foundational elements.
Cake Base Options
Choosing the right cake mix is vital for making great cake pops. For the best results, consider using a high-quality cake mix specifically designed for dense cakes, as they hold up better when mixed with frosting and formed into balls.
The type of frosting used can greatly affect the overall taste and texture of your cake pops. Cream cheese frosting adds a tangy flavor, while buttercream frosting provides a sweeter taste. Choose a frosting that complements your cake flavor.
Coating and Decoration Materials
For coating, you’ll need high-quality chocolate or candy melts. These not only add flavor but also help in achieving a smooth, glossy finish. For decorations, consider using sprinkles, edible glitter, or themed toppers to give your cake pops a personalized touch.
Tools You’ll Need
Essential tools include lollipop sticks, a cake pop stand or styrofoam block, baking sheets, mixing bowls, and a microwave-safe cup for melting chocolate. A cake pop press or cookie scoop helps in creating uniform balls.
Lollipop sticks form the foundation of cake pops and should be sturdy.
A dedicated cake pop stand or styrofoam block provides the perfect drying rack.
A 2-cup glass measuring cup is ideal for dipping cake pops in melted chocolate.
Silicone baking mats or parchment paper prevent cake balls from sticking to trays.
To make perfect cake pops, follow this detailed, step-by-step guide. Crafting cake pops is a multi-step process that requires attention to detail, the right ingredients, and a bit of patience.
Baking the Perfect Cake Base
The foundation of a great cake pop is a moist and flavorful cake. Bake a cake according to your preferred recipe, ensuring it’s fully cooked and then allowing it to cool completely. Avoid overbaking, as this can lead to dry cake pops.
Making the Frosting
Prepare a frosting that complements your cake’s flavor. The frosting should be creamy but not too runny. A good frosting will help bind the cake crumbs together when mixed. Use this frosting to adjust the consistency of your cake mixture.
Crumbling and Mixing
Crumble the cooled cake into a large bowl and mix in the prepared frosting. The mixture should be moist but not wet. It should hold together when pressed between your fingers.
Rolling Perfect Cake Balls
Use your hands to shape the cake mixture into small balls, about 1-2 inches in diameter. Ensure they are as uniform as possible so that they dip evenly in chocolate.
Chilling for Success
Place the cake balls on a baking sheet lined with parchment paper and chill them in the refrigerator for at least 30 minutes. This step is crucial for helping the cake pops hold their shape when dipped.
Adding Sticks and Dipping Technique
To attach a lollipop stick, dip the tip of the stick into melted chocolate or candy melts and insert it halfway into a chilled cake ball. This creates a secure “anchor.” For the dipping process, melt chocolate or candy melts in a microwave-safe container in 20-second intervals, stirring between each heating until smooth. Submerge the cake ball into the melted chocolate, tap gently to remove excess coating, and twirl to coat evenly.
Melt a small amount of chocolate or candy melts for dipping.
Dip the tip of each lollipop stick into melted chocolate before inserting it into a cake ball.
After inserting sticks, refrigerate cake pops for an additional 15 minutes.
Use a deep, narrow container for dipping to ensure a smooth coat.
Submerge the cake ball, tap gently, and twirl to coat.
By following these steps, you’ll be able to create beautiful and delicious cake pops that are perfect for any occasion.
Expert Tips for Perfect Cake Pops
To elevate your cake pop game, consider these expert tips for achieving perfection. Making cake pops that are both delicious and visually appealing requires attention to detail and a few insider tips.
Getting the Right Consistency
Achieving the right consistency is crucial for making cake pops. The cake mixture should be moist but not too wet, and the coating should be smooth and even. The secret to a perfectly smooth coating lies in the proper consistency of your melted chocolate or candy melts—it should flow freely but not be so thin that it doesn’t adhere properly.
Temperature Control Tips
Temperature control is vital when working with chocolate and candy melts. Make sure the coating isn’t too hot when dipping, as this can cause it to be too thin and potentially lead to a messy coating. If using regular chocolate, consider adding a small amount of vegetable oil to achieve the ideal dipping consistency.
Preventing Cake Pops from Falling Off Sticks
To prevent cake pops from falling off their sticks, ensure that the cake mixture is not too soft and that the sticks are inserted correctly. After dipping, gently tap the stick against the edge of your container while rotating it to help excess coating fall off evenly.
Achieving Smooth Coating
For a smooth coating, use candy melts or add a small amount of vegetable oil to regular chocolate to thin it. After dipping, hold the cake pop at a slight angle and rotate it slowly to encourage any remaining drips to wrap around the ball rather than forming a “foot” at the bottom.
Coating Type
Tips for Smooth Coating
Candy Melts
Use as is; ideal for smooth coating
Regular Chocolate
Add 1 teaspoon of vegetable oil per cup of chocolate
White Chocolate
Add a small amount of oil to thin; be cautious of overheating
Creative Decorating Ideas
Unleash your creativity and make your cake pops truly special with these decorating ideas. Customizing cake pops for various occasions can be a fun and creative process.
Color Options and Techniques
Experiment with different color options and techniques to make your cake pops stand out. You can use food coloring to dye your cake and frosting, or try different coating materials like white chocolate or candy melts. For a detailed guide on making cake pops, you can check out this recipe on how to make brownie cake pops.
Sprinkles and Toppings
Add a festive touch to your cake pops with sprinkles and other toppings. You can use themed sprinkles that match your occasion, or try other decorations like edible glitter or candy pieces.
Themed Cake Pops for Special Occasions
Customize your cake popballs for special occasions like weddings, baby showers, or holidays. For example, you can make wedding cake pops with white chocolate coating and pearl sprinkles, or create gender-reveal cake pops with colored centers for baby showers. You can also decorate pops with themed motifs like Halloween ghosts or Christmas trees.
Troubleshooting Common Cake Pop Problems
Even with the best intentions, cake pop making can sometimes go awry. Whether you’re a seasoned pro or a beginner, it’s not uncommon to encounter a few hiccups along the way. In this section, we’ll explore some common issues that cake pop enthusiasts face and provide practical solutions to overcome them.
Cracking Chocolate Coating
One of the most frustrating problems is when the chocolate coating cracks. This can be due to a number of factors, including temperature fluctuations or an improperly tempered chocolate. To avoid this, make sure your chocolate is at the right temperature, and consider using a thermometer to ensure it’s not too hot or too cold.
Misshapen Cake Pops
If your cake pops are misshapen, it may be due to an inconsistent cake mixture or inadequate chilling. To achieve perfectly rounded cake pops, ensure your mixture is evenly balanced and chill it for at least 30 minutes before shaping.
Too Soft or Too Dry Mixture
A cake pop mixture that’s too soft or too dry can be a challenge. If it’s too soft, add more cake crumbs or chill it longer. If it’s too dry, add a small amount of frosting until it reaches the right consistency. The ideal mixture should hold its shape when rolled but not be so wet that it sticks excessively to your hands.
By following these troubleshooting tips, you’ll be well on your way to creating beautiful and delicious cake pops that are sure to impress. Whether you’re making cake frosting or working with frosting cake, the key is to find the right balance and have fun with the process.
Storage and Make-Ahead Options
Proper storage is crucial for maintaining the freshness and quality of cake pops. The shelf life of cake pops depends on several factors, including the ingredients used and storage conditions.
How to Store Finished Cake Pops
Finished cake pops can be stored at room temperature for 1-2 days in an airtight container if they are made with shelf-stable ingredients like buttercream frosting and properly sealed with chocolate coating. For longer storage, they can be refrigerated.
Freezing Instructions
Cake pops can be frozen for up to 6 weeks. To freeze, place them on a baking sheet lined with parchment paper and then transfer them to an airtight container or freezer bag once frozen solid. When you’re ready to serve, simply thaw them at room temperature or in the refrigerator.
Shelf Life Guidelines
The shelf life of cake pops varies: 1-2 days at room temperature, up to 1 week in the refrigerator, and up to 6 weeks when frozen. For detailed storage tips, visit The Cake Girls’ guide on storing cake. Pops with perishable ingredients like cream cheese frosting should always be refrigerated and consumed within 3-4 days.
Conclusion
Making cake pops from scratch is a rewarding process that allows you to create unique, delicious treats perfect for any occasion. With practice, you’ll develop your own techniques and preferences for creating these popular treats.
To achieve perfect cake pops, remember to balance ingredients, maintain proper temperatures, and allow sufficient time for chilling and setting. Don’t be discouraged by initial challenges – even professional bakers encounter issues, and troubleshooting is part of the learning process.
Once you’ve mastered the basic technique, let your creativity shine by experimenting with different flavor combinations and decorative elements. Cake pops make wonderful gifts, party favors, or dessert table centerpieces, making them worth the effort to perfect.
FAQ
What is the best type of cake to use for cake pops?
A dense and moist cake, such as a vanilla or chocolate cake made with a box mix or from scratch, works best for cake pops. The cake should be completely cooled before crumbling.
Can I use store-bought frosting for cake pops?
Yes, store-bought frosting can be used, but it’s recommended to use a high-quality frosting that is not too thin or too sweet. You can also make your own frosting from scratch for better flavor and texture.
How do I prevent cake pops from falling off the stick?
To prevent cake pops from falling off the stick, chill them in the fridge for at least 30 minutes before dipping, and use a small amount of melted chocolate or candy melts to secure the stick to the cake ball.
What is the best way to store finished cake pops?
Store finished cake pops in an airtight container at room temperature for up to 3 days. You can also freeze them for up to 2 months and thaw at room temperature when needed.
Can I use white chocolate for coating cake pops?
Yes, white chocolate can be used for coating cake pops, but it can be more temperamental than other types of chocolate. Make sure to temper the white chocolate properly to achieve a smooth and glossy finish.
How do I achieve a smooth coating on cake pops?
To achieve a smooth coating, melt the chocolate or candy melts to the correct temperature, and dip the cake pop in a smooth, gentle motion. Tap off any excess coating by gently tapping the stick against the side of the bowl.